

How to Install Swift Ties on Your Shoes (Step-by-Step Guide)
Installing Swift Ties is simple and only takes a few minutes. Once installed, you’ll enjoy a hands-free, adjustable fit without tying or re-tying traditional shoelaces.
This guide walks you through the installation process step by step so you can get the most out of your Swift Ties right away.
Step 1: Prepare Your Shoes
Start by removing any existing shoelaces from your shoes. This clears the eyelets and prepares them for proper Swift Ties installation.
Make sure your shoes are clean and dry before installing the unit.
Step 2: Position the Swift Ties Unit
Place the Swift Ties unit centered on your shoe, aligning it with the shoe’s eyelets where laces would normally be threaded.
The unit should sit flat against the shoe for best performance and comfort.
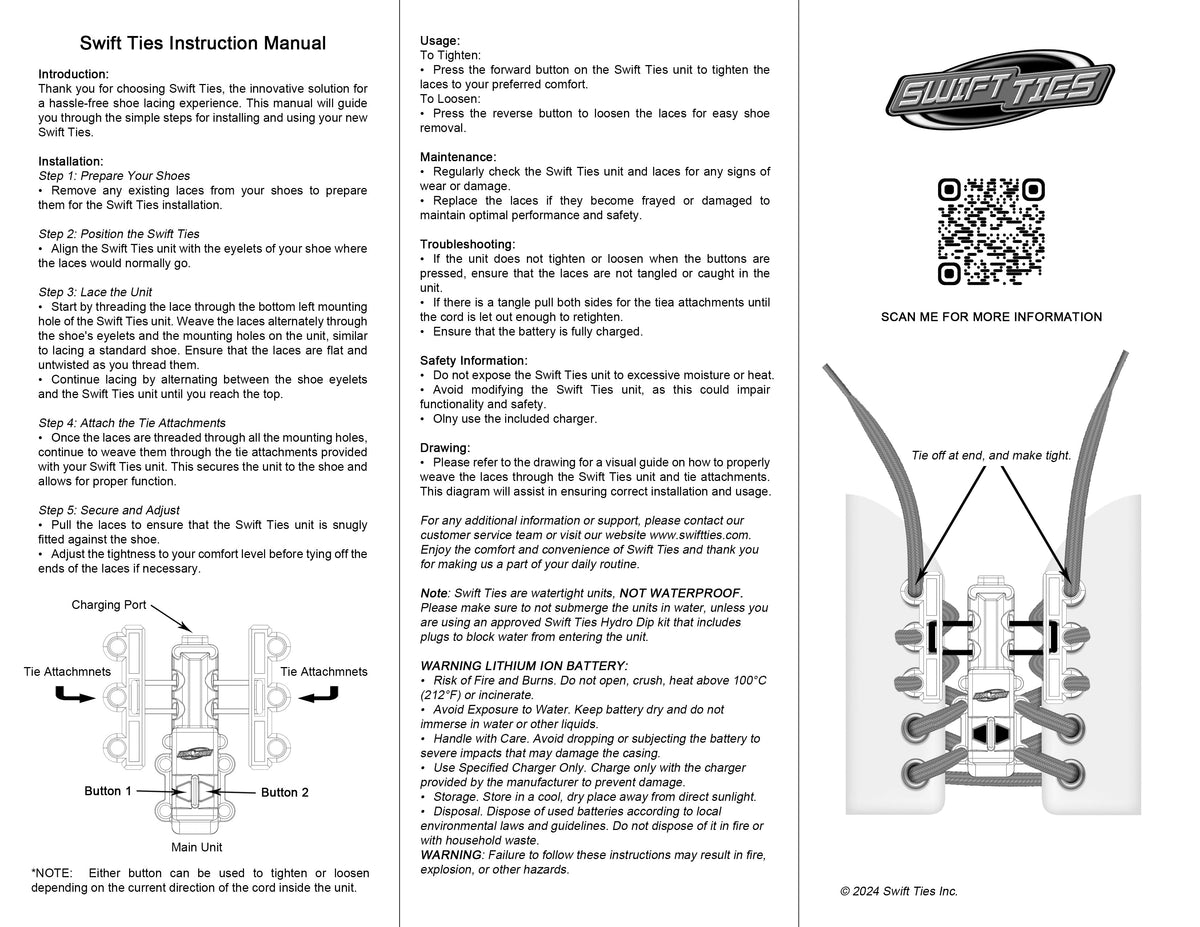
Step 3: Lace the Unit into the Shoe
Begin threading the lace through the bottom mounting hole of the Swift Ties unit.
From there:
-
Weave the lace alternately through the shoe’s eyelets and the mounting holes on the Swift Ties unit
-
Lace the shoe the same way you would with traditional shoelaces
-
Keep the lace flat and untwisted as you go
Continue until you reach the top eyelets.
Step 4: Attach the Tie Attachments
Once the lace is fully threaded:
-
Feed the lace through the tie attachments included with your Swift Ties
-
This secures the unit to the shoe and ensures proper tightening and loosening
Make sure everything is TIGHT but not overly tight at this stage.
Step 5: Secure and Adjust
Pull the laces gently to ensure the Swift Ties unit is firmly seated against the shoe.
Before tying off the ends:
-
Adjust the tie attachments to ensure they are tight
-
Make sure the unit feels secure
-
Tie off the lace ends and cut the end off leave about 1'
Your Swift Ties are now installed.
Step 6: Using Swift Ties
Once installed, operation is easy.
-
To tighten: Press the forward button on the Swift Ties unit until the shoe feels comfortable
-
To loosen: Press the reverse button to loosen the fit for easy removal
Either button may tighten or loosen depending on the current direction of the internal cord.
Helpful Tips for Best Performance
-
Ensure the laces are not tangled inside the unit
-
If tightening stops, gently pull both sides of the lace to release slack
-
Always keep the unit charged using the included charger
Safety & Care Notes
-
Swift Ties are water-resistant, not waterproof
-
Do not submerge the unit in water unless using an approved Swift Ties Hydro Dip kit
-
Avoid excessive heat or moisture
-
Use only the included charger
Ready to Go Hands-Free?
That’s it your Swift Ties are installed and ready to go. Enjoy faster on-and-off wear, consistent comfort, and a smarter way to wear shoes every day.
👉 Learn more about Swift Ties or get support anytime at swiftties.com
Share:
What Are Auto-Lacing Shoes and How Do They Work?
Swift Ties: The Futuristic Wearable Tech Changing How We Wear Shoes